 ELECTRO - TECH, INC.

![]()
![]()
|
|
|
|
Installing Turn Signals in your Classic Car
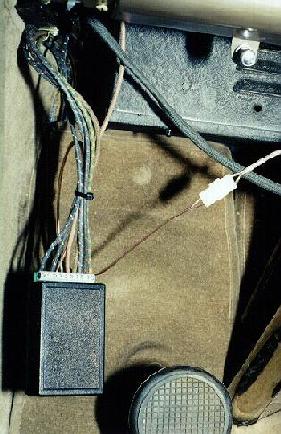
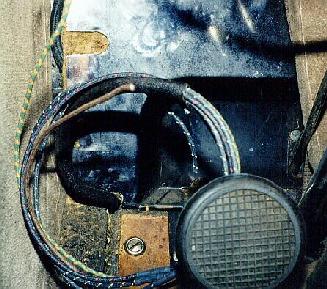
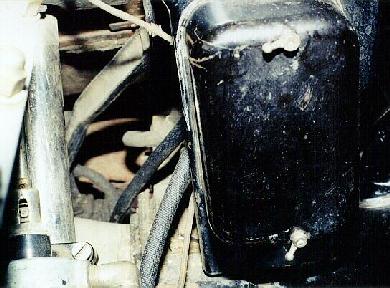
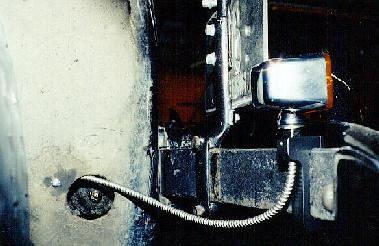
A word about safety: Always remove the ground cable from the battery before doing any electrical work on your car. My grandfather almost lost his hand when his watchband touched the regulator BAT terminal and ground. He burned in his wrist a permanent twist-O-flex image. First, you need to determine the light configuration on the car. I will use two examples, a 1936 Buick Special and a 1935 Lincoln K V-12 (shown). The Buick lends itself well to the installation of turn signals. In the rear, it has separate left and right combination rear tail and brake lights using No.1154 bulbs. Beginning in 1936, Buick mounted bullet shaped front parking lights to the tops of the fenders, ideal for front turn indicators. The Lincoln also has separate left and right rear taillights using an earlier version of the No.1154 bulb but with an non-indexed base. Early 36’ Buick’s have both headlight housing and fender bullet park lights. We have installed turn signals using the park lights inside the headlight housings as the turn indicators. This works fine during the day but visibility at night with the headlights on is poor. We recommend the addition of extra turn lights on these cars if you intend to drive the car at night. If your car has only a single rear brake light, you can add a matching one to the other side of the car. Or, as in the case of some later Plymouth's with a center mounted brake light, add two new lights to the back that can serve as both brake and turn indicators leaving the center brake light alone. This will also greatly improve your braking visibility. Second, you’ll need to add a few wires to your car. You will need one wire from each corner of the car and one from the brake switch running to the turn signal switch or controller. This is the minimum wiring requirement regardless of the type of turn signal switch you install. If you are in the process of restoring your car and intend to replace the wiring harness, ask the harness vendor to add turn signal wires to the new harness. They need to add 1 additional wire to the front, 2 total, one for each front park light. One additional wire to the rear, 2 total, one for each of the rear brake lights. They must also route the brake light switch and park light switch output wires, and the light wires from each corner of the car to the column area of the harness. Be sure to ask when you order the harness. If you are adding wires to an existing harness, look before you leap! . The Lincoln uses a brake light switch that is mounted on top of the transmission and doubles as a backup light switch. The switch and wiring are very hard to access. The easiest way to add rear turn signal light and brake switch connections to a car with an existing harness is to run 3 new wires from the column to the rear junction point or Y to the brake lights. The wires should be run in fabric loom and the cable anchored to the frame rails. This allows connection for both rear brake lights and the brake light switch at a factory connection point and requires little or no modification to the original harness. As you can see in the photo, we have disconnected the left rear, right rear and brake switch feed wires from the factory female bullet connector. We installed a single female bullet terminal on each of the new wires. Due to their condition, two of the original male bullet terminals required replacement. Now you simply plug the factory connectors into the new harness. Be sure to use color-coded wire and note which color you connect to the lights and feed wire.
Front turn signal light wiring is much easier. On the Lincoln, the customer requested new front lights be installed on the bumper brackets. New wires were run in armored loom from the lights to the inner fender then in fabric loom and routed up behind the electrical junction box on the firewall with the new rear light harness. All 5 wires were then run through an existing firewall/floorboard hole near a factory harness. To use the existing parking lights on the Lincoln for turn indicators, run 3 new wires to the factory junction or Y near the radiator just as we did in the rear. The reason for this is the headlight switch for this car is built into the steering column and is very difficult to access.
(3 new wires run to the rear for brake lights and switch)
(Wire routed through firewall inside car) (Front & rear fabric looms routed through firewall) Added custom front turn signal lights
On the 36’ Buick (and many other cars), you only need one new wire to the front left hand terminal block on the inner fender. Remove the right hand park light feed wire at the terminal and connect to the new wire. Route this wire along the factory harness and clips and through the firewall. This provides separate circuits for both the left and right front park lights. The new wire feeds the right hand park light and connects to the right front terminal on the controller. The left hand light is originally fed from the park light switch. Remove this wire from the headlight switch and connect to the left front terminal on the controller. Add a new short wire from the headlight switch terminal (where you just removed the wire) to the park switch terminal on the controller. For the brake lights, run 3 new wires in fabric loom to the rear of the Buick just as we did with the Lincoln.
Fourth, wire the controller to full time power and ground with the supplied wires. Plug the switch connector into the controller. You can now test the controller. Try both left and right turns and manual cancel. You can watch the indicator lights on the front of the controller for proper operation. Next connect the 5 wires from the lights and brake switch to the appropriate connections on the controller. That’s it. Happy motoring.
|
|
Send mail to turnswitch@turnswitch.com
with questions or comments about this web site.
|
 Driving any car on
the road today can be quite a thrill, even more so, in your favorite classic. Ever worry
about being hit? Still using hand signals to let other drivers know your intentions? I
would bet no more then half the current drivers know the meaning of hand signals. Why not
bring your car up to current safety standards by installing turn signals? It’s easy
and we’ll show you how with the self-canceling turn signal system from S&M
Electro-Tech, Inc. One of the many unique features of this turn signal system is the
ability to utilize the front parking lights or side cowl lights as both turn signal and
park lights. A connection from the park light switch to the controller multiplexes the
park and turn signals in the same way brake and rear turn signals function. This
simplifies the wiring and does not require you to change the park light sockets to dual
element units, which can be very difficult. The unit comes with a complete instruction
book and wiring diagrams. My purpose here is to give you more insight into the process of
wiring the car for turn signals.
Driving any car on
the road today can be quite a thrill, even more so, in your favorite classic. Ever worry
about being hit? Still using hand signals to let other drivers know your intentions? I
would bet no more then half the current drivers know the meaning of hand signals. Why not
bring your car up to current safety standards by installing turn signals? It’s easy
and we’ll show you how with the self-canceling turn signal system from S&M
Electro-Tech, Inc. One of the many unique features of this turn signal system is the
ability to utilize the front parking lights or side cowl lights as both turn signal and
park lights. A connection from the park light switch to the controller multiplexes the
park and turn signals in the same way brake and rear turn signals function. This
simplifies the wiring and does not require you to change the park light sockets to dual
element units, which can be very difficult. The unit comes with a complete instruction
book and wiring diagrams. My purpose here is to give you more insight into the process of
wiring the car for turn signals. 
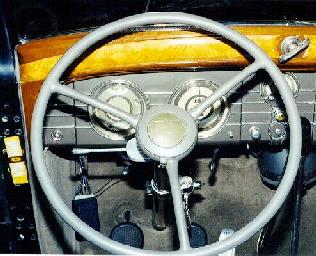
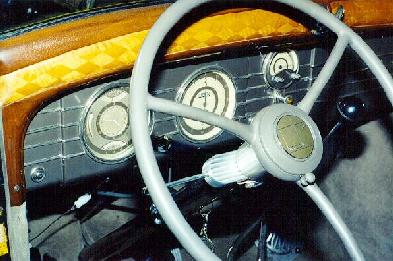 Third, mount the column switch using the supplied
clamp. Slip the 3/8" heat shrink tubing over the clamp and insert the clamp into the
slot on the back of the switch. Wrap the column with the neoprene rubber cushion and mount
the switch over the rubber. Position the switch at a comfortable position on the column
and tighten the clamp. Route the small clear wire around the clamp screw and down the
column (see photo xx). Secure the wire at the base of the column with a cable tie and
route the rest of the cable up behind the dash.
Third, mount the column switch using the supplied
clamp. Slip the 3/8" heat shrink tubing over the clamp and insert the clamp into the
slot on the back of the switch. Wrap the column with the neoprene rubber cushion and mount
the switch over the rubber. Position the switch at a comfortable position on the column
and tighten the clamp. Route the small clear wire around the clamp screw and down the
column (see photo xx). Secure the wire at the base of the column with a cable tie and
route the rest of the cable up behind the dash.